RuneScape Classic Manual
This is a translation of the official runescape classic manual that was available between 2001 and 2002. I did NOT write this guide and take no credit for writing it either. This original manual was written by Jagex for Runescape Classic. The screenshots and several references to them have been update for the current version of classic.
Below is an extremely quick summary of how to play RuneScape, it is recommended that you read the full instructions, but if you don't want to do that, then at least read the very brief guide below:
To explore the world, click where you would like to go. Your player will move to stand with his/her feet at the point where you click.
When you point at any item in the game, a list of available actions will be displayed at the top left of the screen. Click on the item with the left-mouse button to perform the default action. Click with the right mouse-button to display a menu which lets you select from all the available actions.
To talk to the other players just type text with your keyboard. Your message will appear above your characters head for nearby players to see.
To view or use items in your inventory point your mouse at the backpack icon at the top right of the screen. You may then click on an item you are holding to use it.
Talk to the guide near the starting point for some useful hints on how to get started in Runescape.
When you have finished playing you should always use the options menu to logout. This will ensure your character is saved properly for next time you play.
Moving around the world
In order to do anything in the game, you will first need to learn how to get around the world. Fortunately movement is quite simple, and is just a case of pointing the mouse-cursor at the point on the ground where you would like to go, and clicking with the left mouse button.
A small yellow cross will briefly appear to indicate that the request was recevied, then a few moments later your characater will start to move. If the yellow cross appears, but your character doesn't start walking immediately, then just wait a few seconds, as it may take a few moments before anything happens. Your character will walk until his/her feet are at the point where you clicked on the ground, and will automatically work out how to walk around any trees or obstacles which may be in the way.
Interacting with items and scenery
To interact with an item in the world first point your mouse at it. Look at the top left of the screen and you will see a list of things you can do with that item. For instance if you point at an object you will see that you can 'Take' the object, To choose the first option listed click with the LEFT mouse button. To choose from one of the other available options click with the RIGHT mouse button, and choose the option you want from the menu which appears. When you request the action a red cross will briefly appear to indicate it was received. You may have to wait a few seconds for your character to perform the requested action.
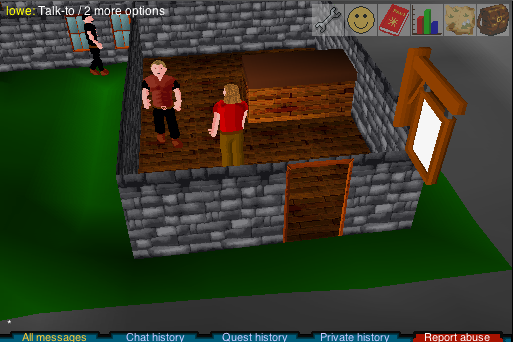
For instance in the example above, the player is pointing at one of the characters in the game, and in this case is given the default choice of "lowe: Talk-to / 2 more options". By LEFT clicking on the character the player could start a conversation and perhaps buy some arrows. By RIGHT clicking, the player could instead access a menu with other available actions.
Rotating the camera
The camera in the game can be rotated by pressing the left and right arrow keys on your keyboard. Regularly rotating the camera to get the best view of the action is a good idea, and is sometimes essential to see objects which you would otherwise miss.
The camera defaults to running in 'automatic mode'. In this mode the game will attempt to automatically detect if a building is blocking your view, and will rotate the camera to a better angle.
However if you want more control you can use the options menu to switch the camera to 'manual mode'. In manual mode you will sometimes find that tall buildings obscure your view. If this happens just press either the left or right arrow key on your keyboard to move the camera around the building.
Trading with other players
Trading items with other players is an important aspect of RuneScape and will often allow you to buy and sell your items at a better price than the shops offer. Many rare items cannot be purchased in the shops at all and can only be obtained by finding them yourself, or by purchase from another player.
Before you start trading you need to find a buyer (or seller). For instance if you have mined some coal and you want to sell it, you could try standing in a busy area and saying "Coal for sale!"
Once you have found someone to trade with, click on their character with the right mouse button, and select the "trade-with" option. The other player will be informed of your request, and to accept your trade they must click on your character and also select the "trade-with" option.
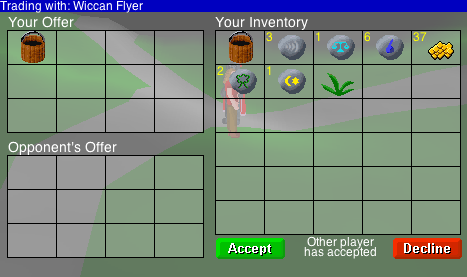
At this point a screen similar to the one shown above will appear. All the items in your inventory are shown to the right, and the items being traded are shown to the left. To add an item to your offer click on it in the inventory box. If you wish to add multiple items (e.g a stack of coins), then hold down the mouse button over the stack until the desired number has been added. To remove an item from your offer, just click on it in the offer window and it will be removed.
The items your opponent has offered are shown in the bottom left hand window. Once you are happy with the proposed exchanged. Press the green "accept" button.
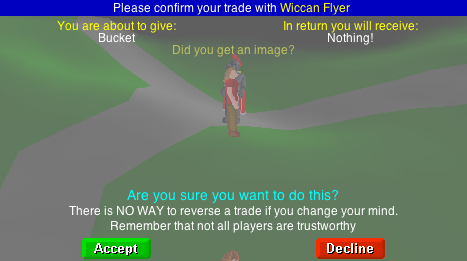
A final confirmation like the one shown above will appear. This clearly lists everything which is being swapped and gives you one last chance to check that you are getting the trade you expected. You should read this information carefully, and then once you are sure you are happy with the trade, press the green "accept" button.
Rememember that there is no way to reverse a trade if you later change your mind. So be careful! Giving items in return for information, or with the promise of getting them back is very risky. Not all RuneScape players are honest, and you could end up losing your items for nothing if you do this.
RuneScape shops
Scattered throughout RuneScape there are many shops where you can buy and sell items. Most the shops will specialise in a certain type of item. For instance the sword shop will only buy and sell swords. In addition to the specialist shops there are several "General stores" which will buy and sell almost anything. However items in the general stores normally cost sligtly more, and they will pay less for items you sell them. If you take the trouble to find the right shop you can often get a better deal.
To access the shop you must talk to the shop-keeper in the store and choose the conversation option to indicate you wish to buy or sell. A screen like the one shown below will appear.
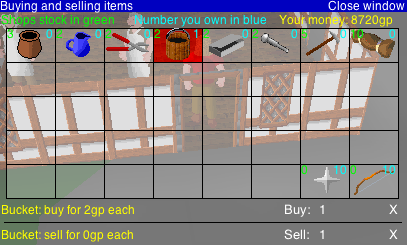
This window shows all the items you can buy and sell at the current shop. In the example here the player is using a general store which means there is a variety of different items shown.
Next to each item there are two numbers. The green number indicates the number the shop has in stock and available for purchase. The blue number indicates the number you are holding, which you could sell back to the shop.
Click on an item with the left mouse button. The item will be highlighted, and the purchase and sale prices will be indicated at the bottom of the screen. These two prices will not be the same since the shop buys at a lower price than it sells out (the shopkeeper is making a hefty profit!). You can then choose to buy or sell the item by clicking on the relevant buttons.
The price of items in the shop also depends on the current stock. If a shop has 500 swords in store it will sell them at a reduced rate to try and clear stock, however it will also pay less for them if you are selling.
The Bank of Varrock
You can only hold 30 items at once in RuneScape and carrying around all your money is risky, because when you die you drop what you are holding. Therefore you need to somewhere to store your extra items and to stash your treasure.
For this purpose the bank of Varrock has opened branches all over RuneScape. Branches of this bank can be found in Varrock, Falador, Edgeville, and Draynor village. When you wish to access your in-game bank account just walk to the nearest bank and speak with one of the banker characters inside.
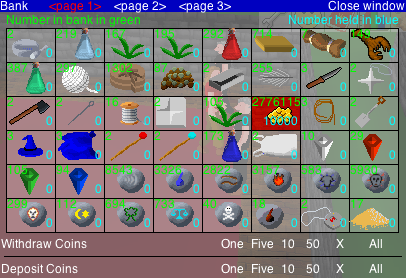
The bank screen shown above will appear, and you can now choose to deposit and withdraw items. All the items in your account, as well as the items in your inventory will be shown. The bankers aren't fussy and will safely store anything from runes to big piles of coal!
Each item has 2 numbers next to it. The green number indicates the number in your bank account, and the blue number indicates the number you are holding. Click on an item to select it. You can then use the deposit and withdraw buttons at the bottom of the screen to move it in and out of your bank account. To deposit a single item press the button labelled "One", to deposit a large stack of items just use the larger numbers. (E.g in the example above pressing the "50" button would deposit 50 coins into the bank account)
The banks are free to use, so making use of them to safely store your extra items is a very good idea!
Using your inventory
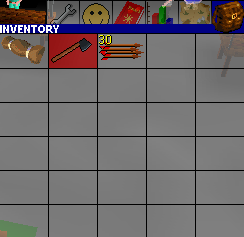
Whenever you pick-up or purchase an item it will be added to your inventory. To view the items in your inventory, just point your mouse at the backpack icon in the top right corner of the screen. Your inventory has 30 slots available. Large items will take up one inventory slot each. Small items such as money can all be stored in just one slot, in which case a yellow number at the top left of the slot indicates how many of that item you are currently holding.
To use an item you are holding, open your inventory, and then click on the item you wish to use. You can then click on another item or person to use the two together. To drop an item you are holding, select the "drop" option, and then click on an empty spot on the ground, and your character will attempt to place it where you indicated.
Armour and weapons are an important aspect of the game. The weaponary you are wielding can often make the difference between winning and losing a battle. To wield a weapon you must first be holding it, then just open your inventory and click on the item you wish to wear or hold. The background will turn red to indicate the item is being worn.
Using the map view
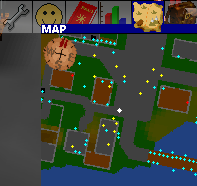
To aid your exploration of the world we have also included a map of the surrounding area which will show you what is nearby. To view the map - point your mouse at the map icon at the top-right hand corner of the screen. A map of the surrounding area will appear. Clicking on the map will make your character attempt to walk to the place you have selected. If the route is blocked, for example by a closed door then your character won't move and you will need to go a different way or remove the blockage (e.g by opening/unlocking the door)
The map shows nearby items of interest as coloured dots:
Objects are shown as red dots. Monsters and game-characters are shown as yellow dots. Fixed locations such as trees & tables as light-blue dots and other nearby players are shown as white dots.
You are the center larger white dot.

Understanding your players stats
To view the stats menu point your mouse at the graph bar icon and select the 'Stats' tab. The stats menu shows your skills and equipment status. Your skills will increase depending on how you play the game. For instance if you fight a lot of monsters your attack, defense, strength and hits will increase. If you cook food your cooking will increase, cutting down trees increases your woodcutting etc...
To determine how close you are to advancing a level, point your mouse at the skill you are interested in. The number of experienced point you have earnt so far, and the number you need for the next level will be shown at the bottom of the panel.
Your equipment status indicates the power of the items you are currently wearing/wielding in your inventory. The armour value is the total of all the defensive items you are currently wearing and modifies your defense in battle. Weapon aim indicates how easy the weapon you are holding is to aim and modifies your attack skills, wheras weapon power shows how much damage the weapon you are holding can do and modifies your strength skill.
You should try to wear the items which give the largest values in the equipment status section. A fully equipped fighter is able to wear a helmet, body-armour, leg-armour and cape, as well as wielding a weapon and shield.
Quests
There are many quests to do in runescape. They have a variety of rewards such as objects and xps towards skills. Also on completion of a quest you will gain quest points which are useful for things such as gaining access to the champions guild.
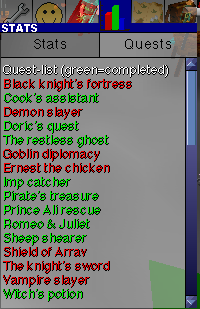
Each quest can only be done once. To view the quests menu point your mouse at the graph bar icon and select the 'Quests' tab. The quests you have completed well be shown in green and those you still need to do will be shown in red.
Below is detailed a brief summary of each quest and where it starts. The starting points for quests are also shown on the world map.
Quest List
Black Knight's fortress - Starts at the white knights castle The black knights are up to no good, you are hired to put a stop to their evil scheme. This is tough quest not recommended for low level characters.
Cook's assistant - Starts at Lumbridge Castle The lumbridge castle cook is in a mess, he needs a lot of ingredients and doesn't have much time. This is a good quest for starting players to try.
Demon slayer - Starts at the gypsy in Varrock square A mighty demon is being summoned to destroy the city of Varrock, you find out you are the one destined to stop him.(or at least to try)
Doric's quest - Starts at the anvils north of Falador Doric the dwarf is happy to let you use his anvils but first he would like you to run an errand for him.
The restless ghost - Starts at the church in Lumbridge Rid Lumbridge graveyard of the ghost haunting it. Not recommended for brand new characters.
Goblin Diplomacy - Starts with the barman in Port Sarim Solve a dispute between the goblins about what colour their armour should be.
Ernest the chicken - Starts with Veronica at the gate to Draynor Manor Veronica's fiancee has been turned into a chicken! Get him turned back.
Imp Catcher - Starts on the top floor of the wizard's tower Imps have run off with Wizards Mizgog's magical beads.
Pirate's treasure - Starts in the pub at Port Sarim Redbeard Frank knows where secret pirate treasure is hidden, it may require some work to persuade him to let you know where though.
Prince Ali rescue - Starts at Al Kharid Palace Prince Ali of Al Kharid has been kidnapped, it's up to you to rescue him.
Romeo & Juliet - Starts at Juliet's house to the west of Varrock Romeo & Juliet are desperately in love, but Juliet's father doesn't approve. Help them to find a way to get married and live happily ever after.
Sheep shearer - Starts in a house south of the windmill Farmer Fred needs his sheep shearing, an easy quest for starting players.
Shield of Arrav - Starts with Reldo in varrock palace library. Can you retrieve a valuable shield stolen from the museum of Varrock by a gang of professional thieves. You will need a friend to help you complete this quest.
The knight's sword - Starts in the white knight castle Sir Vyvin's squire is in trouble. He has lost Sir Vyvin's ceremonial sword. Help him find a replacement without Sir Vyvin finding out.
Vampire slayer - Starts with Morgan in Draynor village A vampire has been terrorizing Draynor Village, put a stop to it.
Witch's potion - Starts in Rimmington Become one with your dark side, by making a potion with the help of Hetty the Rimmington witch.
Dragon slayer - Starts in the champions guild. A very tough quest for more experienced players. Kill Elvarg the dragon of Crandor Isle.
Witch's house (members quest) - Starts in Taverley. Retrieve a lost ball from the witch's house. More difficult than it sounds!
Lost city (members quest) - Starts in the swamp south of Lumbridge. Rumour has it that there is a hidden city under the swamp, can you find it?
Druidic ritual (members quest) - Starts at stone circle north of Taverley. RumBefore you can start using the herblaw skills you must help the druids complete their ritual.
Hero's quest (members quest) - Starts outside the hero's guild. To enter the hero's guild prove yourself as a hero by completing this difficult quest!
Merlin's crystal (members quest) - Starts in Camelot castle. Merlin has been imprisoned inside a giant crystal. Free him and become one of the knight's of the round table.
Scorpion catcher (members quest) - Starts in the Sorcerer's tower, SW of Camelot. Thormac the sorcerer will improve your battle staffs if you can find has lost lesser kharid scorpions.
Using magic spells
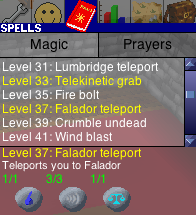
To view the magic menu point your mouse at the spell book icon and select the 'Magic' tab. From here you can select spells to cast.
Below this there is a list of all the spells available. The colour of the spell name indicates if you can cast or not. If the name appears in black your magic level is not yet high enough, and you need to practice with the lower level spells before you can cast it. If the name appears in white your player is sufficiently good at magic, but you are not holding the required runes to cast the spell. If the name appears in yellow then you have everything you need, and the spell is ready for casting.
To cast the spell just click on the spell name, and then click on your desired target in the main game window. Some spells can only be cast on hostile monsters, other spells can only be cast on yourself, experiment to see what valid targets are for each spell.
For more information on a spell move your mouse cursor over the spell. A description of the spell and a list of which runes are required is shown at the bottom of the window. Each required rune has 2 numbers shown above it, the 1st number indicates how many of that rune you have, and the 2nd number indicates how many you require. The numbers will be drawn in red for runes which you do not have a sufficient number of to cast the spell. Runes can be found in many places, the easiest way to obtain the low level runes is to buy them from the magic shop in Varrock. The high level runes can only be obtained by killing the correct monsters.
Rune types
To cast spells in the game you need the correct runes. Each of the runes has a different power and is used for a different category of spell. Information about each of the runes is below:
![]() Earth rune - One of the 4 elemental runes. Can be replaced by a staff of earth.
Earth rune - One of the 4 elemental runes. Can be replaced by a staff of earth.
![]() Air rune - One of the 4 elemental runes. Can be replaced by a staff of air.
Air rune - One of the 4 elemental runes. Can be replaced by a staff of air.
![]() Water rune - One of the 4 elemental runes. Can be replaced by a staff of water.
Water rune - One of the 4 elemental runes. Can be replaced by a staff of water.
![]() Fire rune - One of the 4 elemental runes. Can be replaced by a staff of fire.
Fire rune - One of the 4 elemental runes. Can be replaced by a staff of fire.
![]() Body rune - Required for curse spells.
Body rune - Required for curse spells.
![]() Mind rune - Required for strike spells.
Mind rune - Required for strike spells.
![]() Cosmic rune - Required for amulet enchant spells.
Cosmic rune - Required for amulet enchant spells.
![]() Chaos rune - Required for bolt spells.
Chaos rune - Required for bolt spells.
![]() Nature rune - Required for object conversion spells.
Nature rune - Required for object conversion spells.
![]() Death rune - Required for blast spells.
Death rune - Required for blast spells.
![]() Law rune - Required for teleport spells.
Law rune - Required for teleport spells.
Notes about magic:
After casting magic, your opponent will normally attack you. Therefore magic is a good way to start combat as it can give you a good head start.
Sometimes spells will fail to work. If a spell fails you keep your runes, but you can't perform magic for another 20 seconds. The higher level spells are more likely to fail, but as your magic ability improves you will cast spells successfully more of the time.

Using prayers
As well as using magic spells you can also pray to the gods of RuneScape to give you an advantage. To view the available prayers point at the spell book icon at the top of the screen, and click on the 'Prayers' tab to show the list.
The list of prayers available is colour coded to indicate which prayers you can use. If the name appears in black your prayer level is not yet high enough. If the name appears in white the prayer is available to use. Each of the prayers can be turned on or off individually. Whilst a prayer is in use, your player will be given an advantage depending on the prayer. To activate a prayer just left click on it. The name will turn green to indicate the prayer is active. Click on the prayer again to deactivate it.
Whilst you have prayers active your prayer-points will slowly drain down to zero. The more prayers you use at once, and the more powerful they are, the faster your points will drain. When you run out of prayer-points all the effects will be deactivated, and can't be used again until you recharge your prayer-points. To recharge your prayer-points you must find a church in the game, and left click on the altar to recharge. You are then ready to use the different prayers again.
To use the prayers for longer, and to use the higher-level prayers in the game you need to increase your total prayer-points. You do this by burying bones from monsters you kill. Take the bones, and then left click on them in your inventory to bury them. You need to bury quite a lot of bones to advance a level, but luckily they are quite easy to come by.
Using the friends list and ignore list
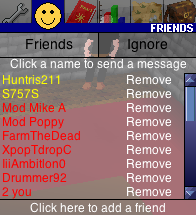
To view friends list point at the smiley icon at the top of the screen, and click on the 'Friends' tab to show the list.
This menu allows you to setup your friends and ignore lists.
The friends list allows you to keep in contact with the friends you make in RuneScape. To add a friend to your list click on the button marked "click here to add a friend", and enter the name of the person you want to add. You will now be informed whenever your friend logs in or out of runescape (unless their privacy settings block this - see 'runescape options' below).
Players on your list who are currently playing on the same world as you are shown in green, players currently playing but not on the same world as you are shown in yellow and players who are not currently playing are shown in red. You can also send a private message to a person on your list who is playing. Just click on the players name and when prompted, type in the message you want to send.
The ignore list is a privacy feature which can be used to block unwanted messages from players. If there is a particular player who you do not wish to receive messages from then first click on the tab marked "Ignore", to access the ignore list. Then click on the button at the bottom marked "click here to add a name" and enter the name of the person you wish to block.
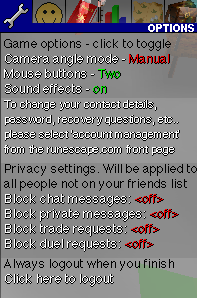
RuneScape options
The options menu allows you to change the settings on your account, and optionally activate various privacy settings. You should also always use the options menu to logout after playing.
The Camera angle mode allows you to toggle the camera between 'auto' and 'manual' mode. In auto mode the camera will attempt to automatically rotate such that your character is always visible.
The Mouse buttons allows you to toggle between using two mouse buttons to control the game, or just one. In single button mode the menu will always appear when you click on more than one item, some people find this easier, and it's also handy if your mouse only has one button!
The following 2 options no longer exist on the options menu:
The 3rd option allows you to switch between 'player-killer' and 'non-player-killer'. If you are a player killer you can attack other players of a similar strength, but watch out because other people will be able to attack you to, and so you will die more often! Be careful when using this option because you can only change it twice. This is to allow you to try each game style to see which you prefer, but to prevent players from only being player killers when it suits them.
The 4th option allows you to change your pass. It is a good idea to choose a long pass which other people will not be able to guess. You should also NEVER tell other players your pass for any reason, the Runescape staff will never ask you for your pass, so if someone asks don't give it to them. It is also not a good idea to use the same pass in more than one place, in case someone manages to guess one of your other passes.
The next 4 options are privacy settings. They are applied to all people who are not on your friends list:
The Block chat messages allows you to block chat (public) messages. Blocks the chit-chat around you.
The Block private messages allows you to block private messages. Messages sent to you by players that have you on their friends list but are not on your friends list.
The Block trade requests allows you to block trade requests.
The Block duel requests allows you to block dueling requests.
The Click here to logout logs you out of the game. You can't log out whilst fighting, or just after combat, but at all other times you are allowed to leave. When quitting runescape you should always use the logout feature here to ensure your player is saved properly ready for next time you play.
Initiating combat
To fight a monster or character in the game just point your mouse at your opponent and select the 'attack' option. Not ever character in the game can be attacked, so if no attack option is visible on the menu, then the character is probably part of some quest or shop, and is not designed to be fought.
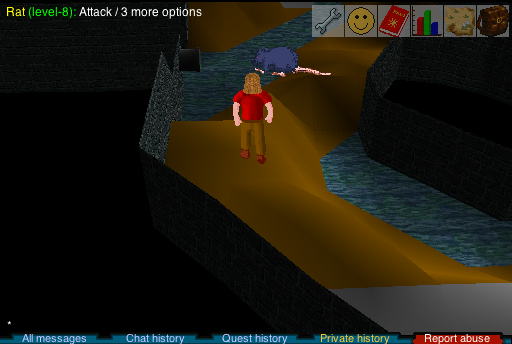
When you point the mouse at your opponent their relative strength will be indicated next to their name. In the example here the rat can be seen to be a level-8 monster. This is also colour coded to help you decide if you should fight or not. It your opponent is weaker than you the indicator is shown in green, for equal opponents it is shown in yellow, wheras for stronger opponents it is shown in red.
Be wary about attacking monsters which are marked as much stronger than you. You could easily die before you get a chance to retreat. Some of the more aggresive monsters - particularly ones which dwell further away from the cities, or in the dungeon, will attack you if you just move near to them so be careful where you go to start with!
During the fight
Once you are fighting a monster an indicator will be displayed at the top left of the screen which you can use to select your combat style. Choosing 'accurate' will make you more likely to hit your opponent. Choosing 'aggressive' means that when you do hit your opponent you are likely to do more damage. Choosing 'defensive' makes your opponent less likely to hit you. Wheras 'controlled' simply improves all three by a smaller amount. The combat style you select also affects which stats you gain experience points in when you kill the monster.
The strength of each combat participent is indicate by a horizontal bar above their head. If your bar is entirely green you are not hurt, it will turn red as you are hit. If the bar goes entirely red your character will die. A number will also briefly appear over you (red star) whenever you are hit by your oppoenent, indicating how many points of damage you just sustained. When you hit your oppoenent a number will appear over them (blue star) indicating how many points of damage you have done to them.
If you find you are losing the battle, then you can run away by clicking on the ground. You can't run away during the first 3 rounds of combat, but after that you are free to retreat. If you do retreat it's best to keep moving until you are some distance from your opponent as they may well pursue you.
Fighting other players
As well as fighting the computer controlled monsters and characters you can also choose to directly fight with other players. Fighting against other players is often a lot more dangerous because they can also use spells and prayers. Also watch out because their friends could be lurking behind a tree ready to finish you off!
Killing other players can potentially give great rewards if they are holding valuable items. However attacking another player sets your alignment to 'evil', and a skull appears above your head to indicate this. As long as your player is marked with a skull the risk is greater. If you die you will drop everything you are holding (you won't get to keep your 3 best items like you normally do!). If you play for 20 minutes without attacking anyone, the skull will disappear and the 3 item protection will work again.
Not everybody likes fighting other players, so to do it you have to go to a special area of the map known as 'the wilderness'. Reaching the wilderness is easy, just keep on walking north and eventually you will get there. The wilderness is a desolate area full of death and danger. As well as the extra risk of attack from other players there are also many nasty monsters. However the rewards are also greater, and there is more treasure to be found if you dare to enter this area.
When you enter the wilderness an icon at the bottom right of the screen will appear to remind you. This also indicates how far into the wilderness you have gone. The further north you go the more dangerous the wilderness becomes. At the south edge of the wilderness you can only fight with players who are a very similar level to yourself, wheras as you go north the range allowed increases, and by the northern edge players of vastly different abilities can engage in combat and the danger is great!
Duelling with other players
Duelling is only available to RuneScape members. Please subscribe to get this feature.
Duelling allows two players to agree to a fight outside the wilderness. Either for an agreed prize, or just for fun. To start a duel with another player right click on their character and select the 'duel with' option. The other player will be informed of your request, and to accept your duel they must click on your character and also select the "duel-with" option.
Both players will then be shown a screen where they can decide how the duel will work. First of all each player decides which items they would like to risk in the duel. If you win the duel you get all the items the other player has offered, but if you lose then the other player gets your offered items. For instance you might decide that you will wager your ruby against your opponents sword. If you wish to just duel to see who is strongest there is no need to add any items.
In addition to deciding on the stake there are 4 other options you can set:
No retreating - Fed up of your opponent retreating? Then tick this box and make it a fight to the death!
No prayer - Disallows the use of prayers in this duel.
No magic - Disallows the use of magic in this duel. Good if you want to save your runes for later!
No weapons - Try a bit of unarmed combat. This option disallows the use of all worn items!
Once both players are happy with the options which have been decided they should press the accept button.
A final confirmation box will appear. This clearly lists what the duel will involve and gives you one last chance to check it and that it is what you expected. You should read this information carefully, and then once you are sure you are happy, press the green "accept" button to begin the fight.
The duel will continue until a player retreats (if allowed), or until one player has died. If a player dies the items they agreed to risk will land on the ground for the winner to take, but they will retain all their other items.
Cooking, Firemaking and Fishing
Cooking skill
There is a variety of different foods you can cook in RuneScape. Food is useful because eating it will heal lost hit points. As you practice your cooking, your character will get better. You will burn food less often, and you will be able to make better food which heals you more.
Firemaking skill
To cook food you will need to use one of the many stoves which are scattered around the map. Alternatively if there aren't any stoves nearby you can build a campfire and use that (although not all foods can be cooked on a fire). To build a fire buy an axe, and use it on a tree to get some logs. Then drop the logs on the ground and use a tinderbox on the logs to light the fire.
Fishing skill
As well as cooking foods such as Meat, Bread, and Stew, you can also catch and cook your own fish. As you get better at fishing you can catch bigger and better fish. Some fish can only be be found in freshwater wheras others can only be found in saltwater. Also different fish require different fishing equipment to capture.
Cooking and fishing guide
A guide to the different foods you can cook, and fish you can catch, is shown below. In addition to the foods listed there are also some low-level foods and drinks which can be brought directly from the shops and pubs in RuneScape.
-Food
-Level
-Required steps
-Meat
-Cooking 1 / Heals 3
1. Meat can be obtained by killing certain animals and monsters.
2. Use the meat with a fire or stove to cook it.
-Shrimp
-Cooking 1 / Fishing 1 / Heals 3
1. Use a net with fish in the sea, to catch some shrimp.
2. Use the shrimp with a fire or stove to cook them.
-Bread
-Cooking 1 / Heals 4
1. Pick some grain, and take it to the windmill to make flour.
2. You will need to use a pot to pick up the flour you have made.
3. Buy a bucket or jug, and fill it with water from a sink or fountain.
4. Mix the flour and water to make some bread dough.
5. Cook the dough by using it with a stove.
-Sardine
-Cooking 1 / Fishing 5 / Heals 4
1. Buy a fishing rod and some fishing bait from the fishing shop.
2. Use the fishing rod with fish in the sea, to catch a sardine.
3. Use the sardine with a fire or stove to cook it.
-Herring
-Cooking 5 / Fishing 10 / Heals 5
1. Buy a fishing rod and some fishing bait from the fishing shop.
2. Use the fishing rod with fish in the sea, to catch a herring.
3. Use the herring with a fire or stove to cook it.
-Redberry pie
-Cooking 10 / Heals 6
1. Mix flour and water to make some pastry dough.
2. Place the dough in an empty pie dish.
3. Use the redberries with the empty pie.
4. Cook the pie by using it with a stove.
-Trout
-Cooking 15 / Fishing 20 / Heals 7
1. Buy a fly fishing rod and some feathers from the fishing shop.
2. Use the fly fishing rod with fish in the river, to catch a trout.
3. Use the trout with a fire or stove to cook it.
-Pike
-Cooking 20 / Fishing 25 / Heals 8
1. Buy a fishing rod and some fishing bait from the fishing shop.
2. Use the fishing rod with fish in the river, to catch a pike.
3. Use the pike with a fire or stove to cook it.
-Meat pie
-Cooking 20 / Heals 8
1. Mix flour and water to make some pastry dough.
2. Place the dough in an empty pie dish.
3. Use some cooked meat with the empty pie.
4. Cook the pie by using it with a stove.
-Salmon
-Cooking 25 / Fishing 30 / Heals 9
1. Buy a fly fishing rod and some feathers from the fishing shop.
2. Use the fly fishing rod with fish in the river, to catch a salmon.
3. Use the salmon with a fire or stove to cook it.
-Stew
-Cooking 25 / Heals 9
1. Obtain a bowl, and fill it with water from a sink or fountain.
2. Pick a potato and place it in the bowl.
3. Cook some meat and place it in the bowl.
4. Cook the stew by using it with a stove or fire.
-Apple pie
-Coking 30 / Heals 10
1. Mix flour and water to make some pastry dough.
2. Place the dough in an empty pie dish.
3. Use an apple with the empty pie.
4. Cook the pie by using it with a stove.
-Tuna
-Cooking 30 / Fishing 35 / Heals 10
1. There are only a few places where you can catch tuna.
2. Use a harpoon from the fishing shop to catch a tuna.
3. Use the tuna with a fire or stove to cook it.
-Pizza
-Cooking 35 / Heals 11
1. Mix flour and water to make a pizza base.
2. Buy a tomato and add it to the pizza.
3. Buy some cheese and add it to the pizza.
4. Cook the pizza by using it with a stove.
-Wine
-Cooking 35 / Heals 11
1. Buy a bucket or jug, and fill it with water from a sink or fountain.
2. Use grapes with the water to make wine.
-Lobster
-Cooking 40 / Fishing 40 / Heals 12
1. There are only a few places where you can catch lobster.
2. Use a lobster-pot from the fishing shop to catch a lobster.
3. Use the lobster with a fire or stove to cook it.
-Cake
-Cooking 40 / Heals 12
1. Mix flour, eggs, milk together in a cake tin.
2. Cook the cake by using it with a stove.
-Swordfish
-Cooking 45 / Fishing 50 / Heals 14
1. There are only a few places where you can catch swordfish.
2. Use a harpoon from the fishing shop to catch a swordfish.
3. Use the swordfish with a fire or stove to cook it.
-Meat pizza
-Cooking 45 / Heals 14
1. Make a plain pizza (see above).
2. Cook some meat and add it to the pizza.
-Chocolate cake
-Cooking 50 / Heals 15
1. Make a plain cake (see above).
2. Buy some chocolate and add it to the cake.
-Anchovie pizza
-Cooking 55 / Heals 16
1. Make a plain pizza (see above).
2. Catch some anchovies by using a net with fish in the sea.
3. Add the anchovies to the pizza.
Mining guide
The mining skill is used to get ores and metals from rocks. The ores can then either be sold or made into different objects using the smithing and crafting skills. To mine, the only object you will need is a pickaxe. These can be bought at the axe shop in Lumbridge for 1 gold coin. Rocks can be found at the various mining sites in the runescape world.
Note: Pickaxes come in several types and prospecting is no longer required in the current version of RuneScape Classic.
If you right click on a rock, you will get the option to prospect it. When you successfully prospect a rock, you will be told what sort of ores you are able to mine from it. Sometimes you will fail to find the ore, so you may need to try prospecting the rock several times to make sure there really is nothing there that you can mine. If your mining level is too low to mine an ore you will not be able to successfully prospect for it either.
To mine a rock select your pickaxe from your inventory then left click on the rock you wish to mine. If there is an ore in that rock there is a chance you will extract it, provided your mining is high enough to mine that particular ore. Ore is quite hard to get out of rocks it might take quite a few attempts before you meet with success. As your mining level gets higher it will become slowly easier. Once someone has taken ore from a rock there will be no ore available to mine from it for a short while, wait a bit and you will be able to mine ore from it again.
Mining levels
Below are listed some of the items you can mine initially. Even more ores can be mined at higher levels
-Ore
-Level required
-Clay
-1
-Copper Ore
-1
-tin ore
-1
-Iron Ore
-15
-Silver
-20
-Coal
-30
-Gold
-40
Smithing guide
The smithing skill is used to convert ores, obtained by mining, into weapons and armours. Many players find that making equipment and selling it to shops and other players is a good way to make money. Smithing has two stages: smelting and forging. Smelting converts your ores into bars. This is done at furnaces. To convert your ore into bars select an ore in your inventory then left click on a furnace.
You will need different combinations of ores and different smithing levels to make each bar. Some of these requirements are shown below. There are even more bars to make at higher levels.
-Bar
-Ores required
-Level
-Bronze -1
-1 Tin ore, 1 Copper ore
-1
-Iron
-1 Iron ore (50% chance of success)
-15
-Silver
-1 Silver
-20
-Steel
-2 Coal, 1 Iron ore
-30
-Gold
-1 Gold
-40
Forging items
You will need a hammer which can be bought from any general store. To convert your bars into armour and weapons you must forge them at an anvil.
Select a bar from your inventory, then select an anvil. In the top left you will be given a series of choices to decide what sort of equipment you would like to make. You will also be shown how many bars are needed to make types of an object. Select what you would like to make and provided you have the required smithing levels and number of bars, your object will be made.
The smithing levels required to forge a metal type are the same as those required to smelt it. However at the levels given you will only be able to forge the most basic items in that metal (mostly daggers). A few levels off these base smithing levels you will be able to make a wider variety of things. For example at smithing level 4 you will be able to make bronze short swords. The gold and silver bars are not used to smith weapons instead they are used in the crafting skill.
Crafting guide
The crafting skill can be used to make different things out of all sort of materials. Gems, gold bars, silver bars, leather and clay are all used in crafting.
Pottery
Bowls, pots and pie dishes can all be made by crafting. Clay is obtained by mining. To make the clay workable it needs to be softened first. Use a jug of water with the clay and it will be turned into soft clay. Take the clay to a potter's wheel. There is one in the barbarian village. Use the clay on the potter's wheel and select what object you would like to make. If you have the correct crafting level you will make an unfired piece of pottery. Use it on the pottery oven and as long is doesn't crack upon heating you will have made yourself a nice new piece of pottery.
Leather
Leather is made from cow hides, so you will need to find a cow field and kill some cows. Once you have a cow hide, take it to the tannery in Al Kharid. You can then craft your leather into leather armour, boots or gloves. You will need to get a needle and some thread from a crafting shop. Select the needle from your inventory and then as long as you have some thread you will be given a choice of leather objects to make.
Gems
Gems are rare objects you will occasionally find, they can be made more valuable by cutting them. Once a gem is cut it can also be used when you are making gold jewelry. You will need to buy a chisel from a general store or a crafting shop. Select the chisel from your inventory and then the gem you wish to cut. If you find your crafting level is not high enough to cut the gem you may want to make a bit more pottery or leather to raise your crafting level first.
Holy symbols
You need a crafting level of 16 to craft silver bars. To make silver bars see the mining and smithing guides. You will need a holy symbol mould which can be bought from a crafting shop. Then use your silver bar on a furnace and you will be able to make a holy symbol of Saradomin. You can either sell your holy symbol to the general store or you can make it into an object that makes your prayers last longer.
If you want to use your holy symbol you will need some string. To make string, buy a pair of shears from a general store. Use the shears on a sheep to get some wool. Use the wool on a spinning wheel to spin it into a ball. Then you can use your ball of wool on your holy symbol to give it a string. Finally you will need to get your holy symbol blessed. This can only be done by taking it to a monk called Brother Jered. Brother Jered is upstairs in the monastery. You will need a prayer level of 31 to get in to talk to him.
Jewelery and amulets
To make gold bars see the mining and smithing guides. You can make amulets, necklaces and rings from gold bars. Buy the appropriate moulds from a crafting shop. Use a gold bar on a furnace and select if you want to make an amulet necklace or ring. Then you will be asked if you want to put in a gem in the jewelry you are making. Putting gems in your gold jewelry can increase the crafting level required quite a lot, it also increases the value of what you are making.
All the gold jewelry can be sold for a good price, but amulets with jewels in them can also be made into useful enchanted amulets which give various bonuses. First of all your amulet will need a string, this is made in the same way as the string for the holy amulets of Saradomin. Then it can be enchanted using the magic skill.
Herblaw guide
Herblaw is only available to RuneScape members. Please subscribe to get this feature.
Herblaw is used to make different sorts of potions and poisons. Before you can use herblaw you will need to do complete the druidic ritual quest.
Identifying herbs
A lot of the herbs you find in the game will be unidentified. To be able to use them you will first need to use your herblaw skill to identify them. Just click on a herb to identify it and if you are high enough level it will then become an identified herb type. As your herblaw level gets higher you will be able to identify more and more different herbs.
Mixing potions
You will need a vial. These can be bought from the herblaw shop in Taverley. Fill the vial with water from a sink or fountain. To make potions you will need a combination of one identified herb and one other ingredient as shown in the table below. You must add your herb to your vial of water first and then the other ingredient. As you reach higher levels you will be able to make more types of potions.
Potion ingrediants
-Potion type
-Level
-Herb needed
-2nd ingredient
-Attack potion
-3
-Guam Leaf
-Eye of Newt
-Cure poison potion
-5
-Marrentill
-Ground unicorn horn
-Strength potion
-12
-Tarromin
-Limpwurt root
-Stat restore potion
-22
-Harralander
-Red spider's eggs
-Defense potion
-30
-Ranarr weed
-White Berries
-Restore prayer potion
-38
-Ranarr weed
-Snape Grass
-Super attack potion
-45
-Irit Leaf
-Eye of newt
-Poison antidote
-48
-Irit Leaf
-Ground unicorn horn
-Fishing potion
-50
-Avantoe
-Snape Grass
-Super strength potion
-55
-Kwuarm
-Limpwurt root
-Weapon poison
-60
-Kwuarm
-Ground bluedragon scale
-Super defense potion
-66
-Cadantine
-White Berries
-Ranging potion
-72
-Dwarf weed
-Wine of Zamorak
Ground ingrediants
The unicorn and blue dragon scale need to be ground before they can be used in the potions. To grind them use the pestle and mortar bought from the herblaw shop.
Weapon poison
The weapon poison can only be used on arrows and on daggers. Weapon poison will only affect players and not monsters. Players can be poisoned by other player's poisoned weapons or by a poisonous npc.
A player will slowly take damage from the poison until it either wears off or they drink a poison antidote or cure poison potion. The poison antidote also grants a small immunity so that the drinker cannot be poisoned for a short while. The cure poison potion does not grant this immunity.
Fletching guide
Fletching is only available to RuneScape members. Please subscribe to get this feature.
Making bows
To make bows you first need to acquire some wood. Depending on the type of tree you chop down you can get different sorts of logs. Next use a knife with the logs to cut them into either a shortbow or a longbow. To make a bow string you need to find a flax plant and use it with a spinning wheel. Finally add the string to the bow to complete it.
Rarer types of wood are harder to acquire, but make better bows which shoot more accurately. The table below lists the different types of bow you can make:
-Bow type
-Fletching level to make
-Ranged level to wield
-Bow
-Shortbow: Level 5 / Longbow: Level 10
-Any
-Oak bow
-Shortbow: Level 20 / Longbow: Level 25
-Shortbow: Level 5 / Longbow: Level 10
-Willow bow
-Shortbow: Level 35 / Longbow: Level 40
-Shortbow: Level 15 / Longbow: Level 20
-Maple bow
-Shortbow: Level 50 / Longbow: Level 55
-Shortbow: Level 25 / Longbow: Level 30
-Yew bow
-Shortbow: Level 65 / Longbow: Level 70
-Shortbow: Level 35 / Longbow: Level 40
-Magic bow
-Shortbow: Level 80 / Longbow: Level 85
-Shortbow: Level 45 / Longbow: Level 50
Making arrows
To make an arrow-shaft just use a knife with some ordinary logs. Add a feather to the arrow shaft, and finally add an arrow-head to complete the arrow. Arrow heads can either be purchased from the member's archery shop, or smithed at an anvil.
Better arrow heads will inflict more damage, but you will require a better bow to fire them. The table belows list the different arrow types:
-Arrow type
-Fletching level to make
-Minimum bow required
-Bronze arrows
-Level: 1
-Any
-Iron arrows
-Level: 15
-Any
-Steel arrows
-Level: 30
-Oak bow
-Mithril arrows
-Level: 45
-Willow bow
-Adamantite arrows
-Level: 60
-Maple bow
-Rune arrows
-Level: 75
-Yew bow
Thieving guide
Thieving is only available to RuneScape members. Please subscribe to get this feature.
The thieving skill is used for a number of different activities. The main uses of the thieving skill are pickpocketing, lock picking, trap disarming and stealing from market stalls.
Pickpocketing
It is possible to steal from various npcs in the game, it is not possible to steal from other players. To start off with you can only steal from men, later on you can steal from farmers, warriors, guards and more. To pickpocket an npc right click on it and select the pickpocket option. There is a chance that the npc you are stealing from will notice and will attack you. As your thieving skill increases, you will get noticed less often. Below are the levels required to pick the pockets of various npcs
-Character
-Level required
-Man
-1
-Farmer
-10
-Warrior
-25
-Guard
-40
-Knight
-55
-Paladin
-70
-Hero
-80
Lockpicking
Certain doors in the game can only be opened by picking their locks. To pick the lock on a door right click on it and select the picklock option. A low level thief will only be able to pick the locks on 1 or 2 doors, as your thieving level increases you will be a able to get into a greater variety of new areas.
Trap disarming
Certain objects in the game such as chests have traps on them. If you don't disarm a trap on an item, you could receive damage or other penalties when trying to use it. If there is a trap to disarm you will find an option to disarm the trap when you right click on the item. If you are a high enough thieving level you will then be able to disarm the trap. Remember traps will become re-enabled again later.
Stealing from market stalls
You can use your thieving skill to take goods from the various market stalls in Ardougne. To steal from a market stall right click on it and select the "steal from" option. If you are a high enough level your character will attempt to steal something from it. Certain characters will try to stop you stealing from market stalls, so wait until these npcs do not have a line of sight to you or are otherwise distracted/dead. Below are listed the thieiving levels you need to be able to steal from the various market stalls.
-Stall
-Level required
-Cake stall
-5
-Silk stall
-20
-Fur stall
-35
-Silver stall
-50
-Spices stall
-65
-Gems stall
-75
Security Tips
The old tips are of little use, so here is a link to the current Support Guides & Updates by Jagex.
Rules of Conduct
The old rules are of little use, so here is a link to the current Rules of RuneScape by Jagex.
Terms and Conditions
The old terms are of little use, so here is a link to the current Terms & Conditions by Jagex.
Privacy Policy
The old privacy policy is of little use, so here is a link to the current Privacy Policy by Jagex.