Home Accounting
In the beginning:
I was going to develop Home Accounting ( referred to as HA ) in Prograph 2.5.2, but hearing of the near release of CPX I decided to wait. Because of the resource requirements for CPX, I needed to upgrade my Mac II. Since I had just made my last car payment, I decided to take a loan out and buy the top-of-the-line Mac, a Quadra 840AV. I received CPX about two weeks before the Thanksgiving holiday. I used those two weeks to learn CPX and port my Concentration ][ game over from Prograph 2.5.2. Initial development of HA occurred during the breaking in period of my new Mac.
What it is:
Home Accounting is an application to help manage your personal cash registers. HA also provides a simple means of budgeting your income and expenses. The electronic cash register is designed to resemble your manual cash registers ( check register and savings register to name two ). One main difference is that the electronic form manages all the registers in one view, whereas with a manual register you should have one register book for each cash account. Sometimes checking and savings are combined by splitting a single register book. Most home register books can not contain a full years worth of entries, causing you to split the registers into three or more books. All this leads to a management problem. HA can build a year long register which contains Post Dates ( the date of entry ) for a single year. Electronic registers help most when it comes to balancing the register to a monthly bank statement. This balancing act is called reconciling the register.
Why I wrote it:
I wrote this application at the request of my sister. She wanted a much simpler application than the ones commercially available. They are designed for a small business or people who manage their personal finances as if they were a small business. She wanted to enter her check book and savings information into the application, budget her expenses and be able to see in a single window where her money was going on a monthly basis. She was very impressed with CPX. She would point at the screen and say "Can it look this way and show this information?" Within minutes she would have a working application that did just what she asked.
History:
I developed the initial working application in the two days I spent at her place over the Thanksgiving holiday weekend. During the weeks leading up to the Christmas holiday, I spent a few hours cleaning up the interface, adding a *Read Me* file, Error message window, Calculator and a Help window. During the two weeks of my Christmas vacation I added all the basic features except those dealing with file I/O and printing. This became version 1.0.0.d1. The version number is broken down into 4 parts; version, major revision, minor revision and test revision ( development, alpha, and beta ). The test revision does not appear in a public release. An appended "pX" indicates a preliminary release to fix a serious bug in the previous revision, but does not include all features of the new revision. As of Mar. 28, 1994 the available version was 1.0.0a1p1. This is a demonstration version with a 50 entry limit. The preference files and data bases between any two versions are not compatible. An older version's files may crash the latest version of the application. I will release a converter with the newest version which should be available soon. Version 1.0.0a1 is scheduled for release in April with all functions working. Refer to the *Read Me* and Version History files for the latest status of HA.
HA vs. Commercial software:
HA is not designed to compete with commercial applications like Quicken. HA does not contain all the fancy features, like writing checks for you, checking the stock market, calling your bank, handling your taxes, etc. HA's advantages are; a much simpler interface and a design very similar to a personal check book.
General Description:
The Help window is basically the manual, therefore the following description is brief.
In HA all register functions occur in a single window. Setting application preferences occurs in another window. All budgeting information is contained in two other windows ( annual and monthly ).
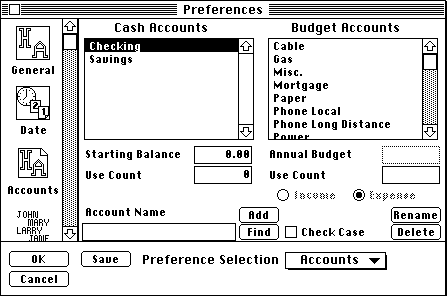
When the application starts it first opens the Check Register window ( Figure 2 ) then the Preference window ( Figure 1 ). You can select the preference group to edit by selecting a group icon in the left scroll column or a group name from the popup menu. In the General preference, you set the name of the owner of the data base ( you can have a register for more than one person ). In the Date preference, you set the default year of the data base. In the Accounts preference ( Figure 1 ), you setup your cash and budget accounts. In the Names preference, you can assign a name to each budget account. The changes you make here can then be saved and used as defaults for any newly created data base. Clicking on the OK button updates the preferences in memory. There are four additional preference categories that are selectable but are not functional in the present version, Auto file Saving, the Check Register grid text color and background settings, Print management and Security.
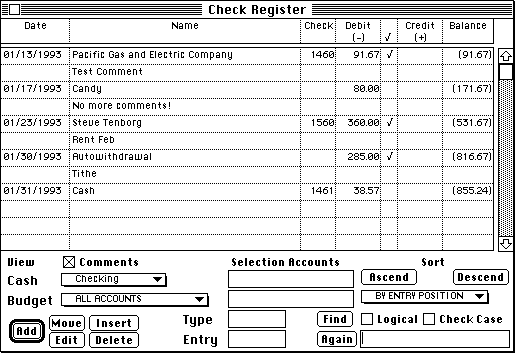
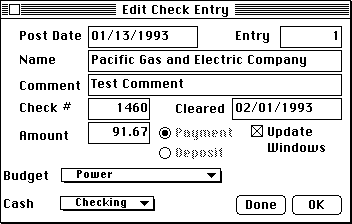
From the Check Register window ( Figure 2 ), click on the Add button to add entries to the data base. To edit an entry, double-click on it. Adding, editing, and inserting data into the data base are done through one of the Data Entry Windows ( Figure 3 ). Pressing the Done ( or Cancel ) button ends the data entry process.
How the data is displayed in the Check Register is dependent upon the display setting, sort selection, comment selection and the scroll bar setting. You select which Cash Accounts and Budget Accounts are to be displayed through the popup menus. The display information can be sorted by any of the columns from a popup menu or by double-clicking on a column header. You may sort in ascending ( earliest entry ) or descending ( latest entry ) order. The scroll bar selects which 12 ( or 6 ) entries to view ( showing comments reduces the number of displayed entries by half ). The display and sort functions do not affect the data base. The Insert, Delete and Move buttons affect the data base directly and allow you to modify the entry order to match your manual check book.
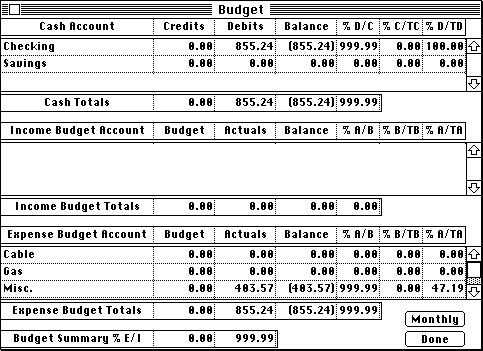
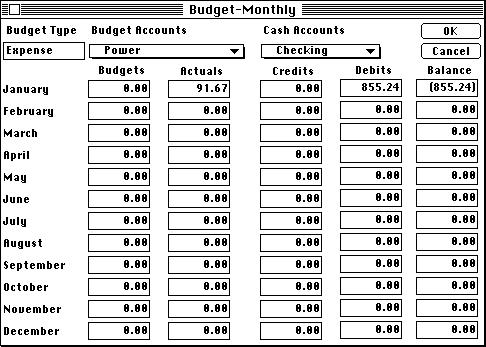
Having entered data into the data base you can now see how your budgets are doing. From the Window Menu select Budget. The Budget window ( Figure 4 ) shows cash, income budget and expense budget account statistics on an annual basis. To see a monthly report, click on the Monthly button. In addition to showing monthly statistics, the Budget-Monthly window ( Figure 5 ) allows you to set the monthly budget amount of the selected budget account. The Accounts preference sets the monthly budgets by dividing the annual budget amount by 12.
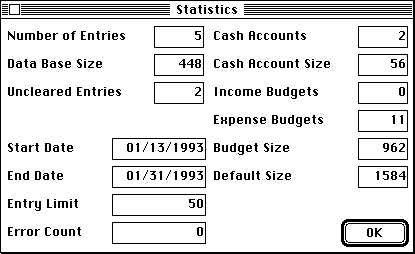
The Statistic window ( Figure 6 ) was created to help me determine what the application was doing when I changed things. However, most people liked the statistical information, therefore it has been made a permanent feature.
Development Details:
The first thing I do when I create an application is to create a project folder. This folder contains my project file, workspace sections ( I usually place my window classes and debug code in a separate sections ), resource file, editor preferences, any modified ABE or ABC sections ( specific to this project ), graphics and text files. Double-clicking on the project file, will cause CPX to use the sections in this folder first. Thus you can make editor preferences and modified ABC and ABE sections project specific. However any ABC or ABE sections modified because of error fixes I place in folders titled "Modified Sections". One folder in the ABC Sections folder and the other in the ABC Editor Sections folder. The replaced sections are moved to folders titled "Old ABE Sections" and "Old ABC Sections" inside the Application Builder folder. This way the modified sections are now used but are kept separate from the original ones.
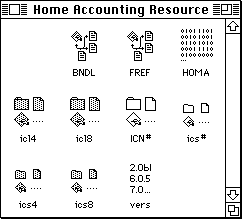
The resource file is a ResEdit file which contains default resources ( Figure 7 ). I edit this file and then paste the resources into my project file. This saves a lot of time in creating these resources.
PICT resources are placed directly into one of the application sections ( usually the section that uses them ). I use bit-mapped graphics as much as possible. Fancy object graphics can require as much as a 100 times more memory than a bit-map. If you don't need to resize the picture, a bit-mapped graphic will display thousand's of times faster than an object graphic.
I create most of my graphics using Denaba's Canvas 3.5. This application is relatively inexpensive, handles both bit-mapped and object graphics, and has so many tools you can do just about anything. However it is a little quirky. Because I am not a graphic artist, it's not easy for me to produce fancy results. Just so you don't take this to be a sales pitch for Canvas, I use many applications to develop an application, Canvas just happens to be my choice for most graphics generation and conversion.
Development Phases:
Next I'll describe the basic development phases I used in creating the Home Accounting application. Some of the "why" is described later in the article, for example Mouse Up vs Mouse Down.
A preliminary manual describing the application was written.
The preliminary window layout drawings and data base structures were designed. Since the data base memory requirement ( 500 to 1000 entries ) was expected to be less than 100 kb ( 5% of the expected size of the application ), the data base is stored in memory.
The About method was written. This is the easiest thing to produce and gives an immediate feeling of success.
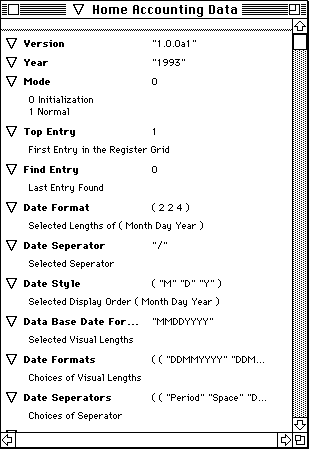
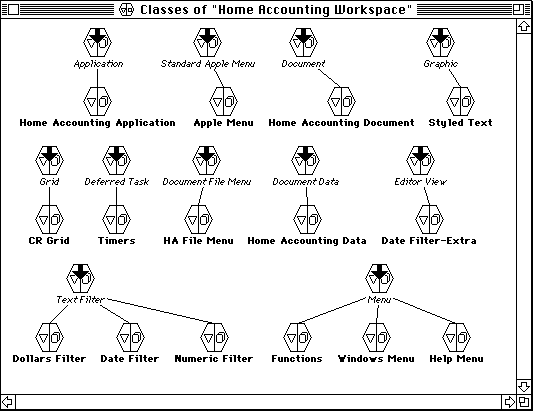
The Home Accounting Data class was created. The attributes of this class ( Figure 8 ) are used as global variables.
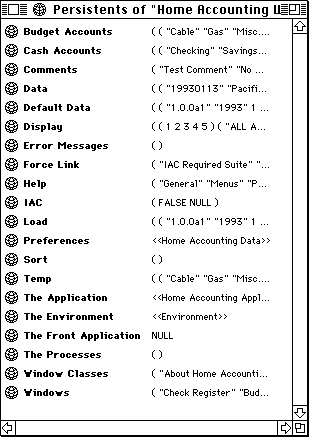
The initial persistents ( Figure 9 ), were created to store the data base and other data.
The main document window, Check Register ( Figure 2 ), was created to display the data base.
A modified version of the Document File Menu, HA File Menu ( Figure 10 ), was created.
The Annual and Monthly Budget windows were created, which provide information about the data base.
A Preference window which allows adding, modifying and deleting accounts was created. If only one person uses the application, the accounts could be hard coded, but it is more useful if most of the information can be modified by the user.
Debug routines were added, to tell me what's actually changing ( I made this section an Editor only section so it doesn't get compiled ). Initialization routines were added to set attributes to a known and consistent state. Most of the initialization routines deal with the grids and functional testing of various routines.
Debug example:
In my preference file loading routine, the application checks the version number of the loaded file. If it's wrong an error message is placed in the Error Message persistent. In the beginning I wasn't checking this, but after creating the Statistics window, I noticed the error message count was 35. I forgot to unpack the version information before checking the version number, so an error message was generated. The bad version number is included in the message which showed that it was not being unpacked ( a list was shown in the message rather than a number ).
Initialization example:
The grid rows are created and each cell is filled with a Text instance, then a Pen instance is added to give a color background ( or pattern ), a Font instance is added to set the style, size, justification, and color of the Text.
To save coding time I usually just copy locals from one method to another when the same or similar function is to be performed. This means I generally end up with the same code being repeated in several places. Here is were I start looking for ways to reduce the number of locals used. To reduce the code size, I convert one of the locals to either a universal or a class method. I then replace all the similar locals with a call to the universal or class method. Small variations in the locals are taken into account by passing additional parameters.
Application Alpha Phase:
After all of the above, HA enters the alpha phase which involves getting all the features working. This phase is used to workout the applications core bugs ( i.e. it doesn't add the credits correctly in one place, text in one box is left justified instead of right justified, you can't gain access to the help window because a modal window is open, etc... ).
Application Beta Phase:
This is the last stop before release. Here I deal with the user interface ( color, shadows, 3-D affects, default buttons, location of window items, balloon help, etc... ). I also try to find the minimum and recommended system requirements ( RAM, system version, etc... ). This is also the point at which I deal with platform specific problems.
Application Execution:
The present Init, About, and About/Mouse Up methods are fairly complex. They include code to handle both System 6 and 7 Finder launching, a Preference file, and non-document based use of the document focused classes and methods.
Startup Phase:
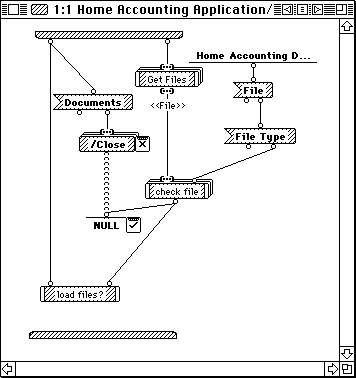
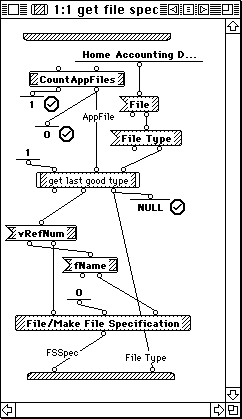
If the application was launched ( under system 7 ) by double-clicking on a data base file, then an Apple Event will be posted and the Home Accounting Application Class method Open Documents ( Figure 11 ) will be executed. This method resolves the Apple Event 'odoc' ( open document ) into a list of File instances. This list is passed to the local ( valid file? ) which finds the first valid file specification ( file type for my data base ). If a valid file is found, then all open documents are closed ( there should be only one ), otherwise the method is terminated. The first valid file specification is then saved in a persistent used only for Apple Events and a flag is set to indicate that a valid startup file is available for loading at the end of the initialization phase. With System 7 a user may drop a file on top of an application icon. The finder searches the FREF resource for file types that can be opened ( or any file type ) by the application. When you create a BNDL resource you are creating file types for your application. These types are automatically added as FREF resources ( if you use ResEdit to create the BNDL resources ). HA does not yet load 'pref' or 'TEXT' resources by way of Apple Events. Therefore the local ( valid file? ) needs to remove non-loadable File instances from the list.
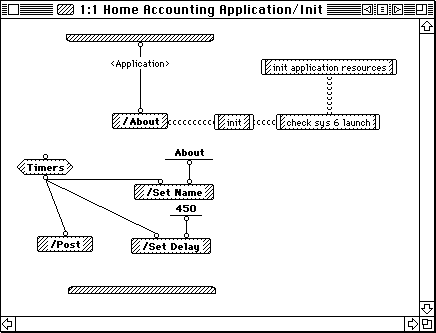
The Init method creates an instance of the Home Accounting Data class and places it in the persistent Preferences ( so that changes made by the application running under the interpreter will not affect the next run ). The Init method then calls the About method.
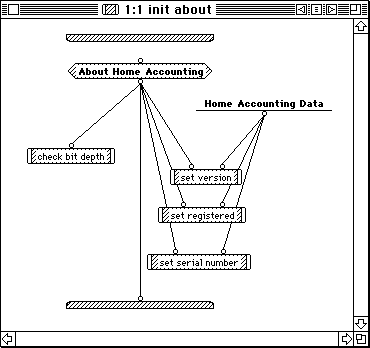
The About method first checks to see if the About window is already open. CPX is a document based environment and creates document windows on the fly by creating instances of a window class. If I did not check, the user can create so many ( About ) windows that the application will crash when it runs out of memory. Since the application is just starting there will not be another About window. The next case executes ( Figure 12 ), which creates an About window instance. The window items are then initialized. Since a color graphic is used in the window, the display screen is checked for color. If the pixel depth is 1 ( monochrome ) then the alternate Black & White graphic is used, other wise translation to the screens bit-depth is left up to QuickDraw.
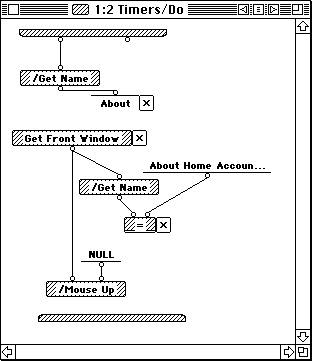
The startup About window is designed to time-out after 7.5 seconds, if the user doesn't press the mouse button. Therefore the application uses an attribute ( Mode ) to determine what execution phase the application is in ( 0 startup, 1 normal, etc... ). If the application is in startup, a Deferred Task is posted ( Figure 13 ), which will execute after the amount of display time has passed. If the user clicks the mouse button, the About windows Mouse Up method is called. If the user does not click the mouse button the deferred task will occur. The Deferred Task subclass ( Timers ) method Do ( Figure 14 ) executes which in tern calls the About windows Mouse Up method. Selecting the About in the Apple menu only opens the About window and does not post the deferred task, thus requiring the user to press the mouse button to close the About window.
In Prograph 2.5.2, I did a great deal of System Class modification to do the above. The new structure of CPX has made coding timed events a great deal simpler ( just a couple of methods are needed ).
The About windows Mouse Up routine checks the execution phase of the application. If it is in startup, then the About deferred task event if found is deleted.
Initialization Phase:
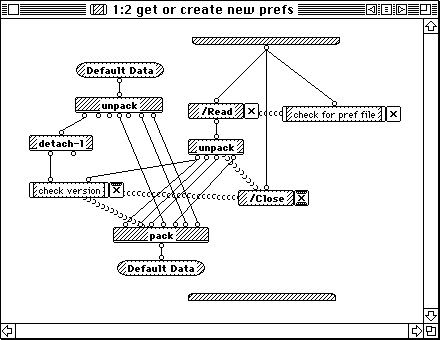
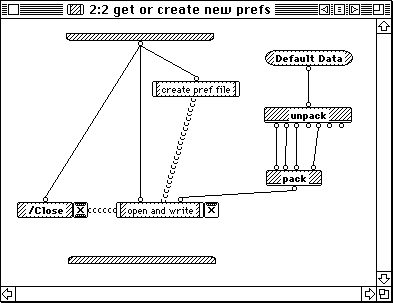
Several locals split up the initialization phase into discrete functions. The mode is set to normal ( 1 ). The Preference file is loaded if found ( Figure 15 ), otherwise a new one is created ( Figure 16 ). If running under System 6.0.x, a check is made of the Finders AppFile record ( Figure 17 ) for any file that needs to be loaded ( as before only the first valid file is accepted ). For system 6.0.x the AppFile record is converted into a FSSpec record so that the rest of the application has to deal with only one file structure. If no data base is loaded a new document is created. In any event the Preference window is created and displayed.
Document vs. Non-Document:
HA is not a document based application, but it makes use of all the file I/O and printing features of a document based application. This is done by trapping document function calls with my own overshadowing methods in the following classes; Home Accounting Application, Home Accounting Data, Check Register, Print View and Print Layout.
In a non-document based application there is no relationship between a documents data and the document window's attributes. Also you can only have one document window type open at a time. To make this work, you need to add your own Document Data /Set Value and /Get Value methods, add Extract Data and Install Data methods to your document's window class. You need to modify your Application /New Document, Open Documents, Open One Document methods to deal with the document of the application. This isn't that hard, but it is not described anywhere; exactly what to do and where to do it. Since all this deals mostly with files and printing you can leave it to the end of the development stage. If you program correctly, these added functions will be independent of a working application.
Mouse Up vs. Mouse Down:
Overshadowing the Mouse Up method rather than the Mouse Down method prevents the following possible error from occurring:
If the About window is closed before the mouse button is released, the item behind the About window ( menu bar, window or desktop ) will receive the Mouse Up event rather than the About window. You should always direct events to the correct handler ( in this case the About Home Accounting class ).
Window Bar vs. Popup Menu vs. Icon Scroll List:
Some users like selecting from a menu list, some like using command key short cuts, and others like clicking on icons. The Icon Scroll List and Popup Menu features were added to meet all these preferences.
The Grid Class:
The majority of my problems with CPX was in the use of the Grid Class. When the CPX 1.0.1 update came out most but not all of the problems went away. However, creating and initializing a grid is not supported in the ABE's. Therefore iI had to write a universal method that would initialize the check register and budget grids. This created a whole new set of problems, one of which is that a method executed from the interpreter needs to use direct class referencing.
Since a register resembles a grid, I used the Grid Class.
A couple of problems with the grid class are; it is not designed to handle more than about 100 cells. Placing a Text instance in each cell of a 500 row by 9 column grid, will not only suck up lots of memory but execution speed would be drastically reduced.
A problem with not using the grid class is the additional coding involved to do it any other way.
One solution to the grid problem is to use a limited grid. The grid is fixed in size and becomes just a window into the data base. The code to manage the contents of a fixed grid is not to complex, but how to scroll the contents becomes a problem. Since the grid is of a fixed size you can't use the scroll bar feature built into the grid class.
My first solution to the scrolling problem was to add buttons that adjusted an attribute that keeps track of the entry number for the first grid entry. Eight buttons were used ( page up & down, line up and down, 1/2 page up and down, first and last entry ). This method made for a very crowded window ( my sister's monitor is 12 inches ). A small grid size on a small monitor forced me to reduced the size of the text to 9 points ( not easy to read ). Rearranging the window items, deleting the buttons, and adding a scroll bar to the right of the grid, eased some of the crowding. The Scroll Bar Control is not well documented and not intended for this use. It took trial and error to determine how to make it work. Once I got it working, I found it is easy to add and use.
The header needed to be another grid. If I didn't use another grid, then a few of the problems that would be encountered are; the extra work keeping one row separate from all the others, the scroll bar should not be related to the header, the row height of the header is different than the rows containing data.
One of the biggest problem with the grid was when I added color to the even numbered rows ( comment lines ). Two of the problems encountered were;
First, when setting the color of a text item or the background pattern does not cause the grid to be drawn with the new settings. Therefore, these changes must be detected with overshadowing methods. This is why I created the subclass CR Grid.
Second, CPX uses the InvertRect Mac Tool Box routine everywhere to invert the pixels on the screen. The InvertRect routine was designed for black and white pixels ( when the Mac II came out, QuickDraw was extended to use eight colors ). When I set the first cell's background color to a light blue and selected a row, the border around the row and the text inside the cells went to white and the white cells went to black. But the light blue background stayed light blue. The solution to this problem was to overshadow any method that uses this tool box call in my subclass. Fortunately, I only needed to overshadow five methods. Basically I needed to restore the color of the old selection, update the grid, color the new selection, then redraw the grid.
The last set of problems encountered with the CR Grid was getting it to update correctly for all possible events in HA. This turned out to be complicated and difficult to solve. There was a lot of interaction between HA and the interpreter's debugger as well as between the Mac operating system and the compiled HA application with regard to the refresh timing.
It took about a month to resolve all the problems with the CR Grid subclass.
The Multiview Class:
At the start of version 1.0.0d9 it became apparent that the preference window was becoming very crowded. To reduce screen clutter I decided to use the Multiview class to organize the preferences by function. The Multiview class introduced another set of problems. The first of which is that there is no editor for it. PI was supposed to release a Multiview editor with their Prograph Developers Network subscription, but didn't. These are the steps I used to create the Multiview ( it took hours to figure this out ):
1) Created a view to hold the views of my Multiview.
2) Created three preference views ( General, Date and Accounts ). It is easier if all the views are the same size.
3) Selected the related window items that would go into one of the views and cut them. Opened the view that would hold the cut items and did a paste. This was done for each preference view.
4) Placed all views on top of each other and set their visible and active attributes FALSE. However, when this was tried several items ( edit text, scroll bars, etc… ) where still visible. From Prograph 2.5.2 experience, I used the trick of placing the views outside the viewable portion of the window. That is outside the window's frame, not the main view's frame, because in PG 2.5.2 during redrawing, an invisible item (outside the view, but inside the window) appeared momentarily as a white rectangle when I used a background other than white.
5) Edited each view and reduced the size of the holding view to the size of the largest preference view ( they should all be the same size ).
6) Edited the instance of the holding view and converted it to a Multiview ( copy value of holding view, select Multiview, then do a paste value ).
7) Placed the name of the General view into the Multiview's default view attribute.
One big problem with the Window class is that the tab handler doesn't know about Multiviews. Very strange behavior occurs when the present target is not in the visible view ( and even more strange when a filter is present for that target ). To correct this, I set the tab list for the window to an empty list. Then after calling the switch method I called the views tab method ( the root on switch is the instance of the new view ).
At first I used a Popup menu to call the switch method. It was fast and easy to create relative to the present icon button scrollable list now used.
The Style Text Class and Scroll Style Text view:
This class was created to provide a scrollable styled text view for the help system. These classes are general purpose and as soon as they are refined I will post them on AOL. They use the resources 'styl' and 'TEXT'. However they can also use the text in the data fork as well. It took about a week to get them working right. The only problem at the moment with them is that the scroll class can not tell how many vertical pixels the drawn text will require, so the scroll bars maximum limit must be set manually ( as well as the Limit attribute for the view ).
File Stuff:
I overshadow the Get File Name method to create unique file names based on the front window. If I didn't do this, the default suggestion for a file name would be "untitled". I try to supply some useful information in the file name, which can be longer than 31 characters.
The File menu New command saves only the cleared entries in the data base. This of course clears the dirty flag. If there are uncleared entries, then the dirty flag is set and the FSSpec record is set to NULL which forces the save dialog box to prompt for a new file name. Otherwise the data file containing the cleared entries will be overwritten and replaced by the uncleared entries.
Alternative About Routines:
If my application were to do initialization as CPX does, the posted deferred task would only set a time-out flag indicating that the minimum display time for the About window had expired. This is extended so that when the initialization phase ends the time-out flag would be checked, if set, the application would continue normally. If it wasn't set, the remaining time would be acquired, the old post would be deleted and a new post, described in the Startup phase, would be posted. All this makes sure that the About window stays on the screen long enough to be read by the user, but at the same time will not hold up the operation of the application if it is being controlled from another application or remote user.
IAC Hell:
In the February issue of the Visual News is an article by Richard McDonald titled "My weekend with IAC." Outside the compile time of his application ( HA's is about 15 minutes on a Quadra 840AV ), it's a fairly accurate description of what I went through in getting HA to open a document by double-clicking on it in the Finder.
I had code from a Prograph 2.5.2 application that used the CountAppFiles ( and the other required stuff ), which I imported into HA. Since my initial testing with file launching took place on a Mac II running system 6.0.8, no problem was detected until version 1.0.0d9 ( there were other problems that masked the IAC problem under system 7 ). After a grueling night of trying to solve the launching problem, I went up on AOL to determine if anyone else was having the same problem and more importantly if there was a solution. Sure enough, PI had posted a solution ( to several queries ) which I down loaded. Using cut and paste from my word processor ( on the class and method names to link ) into the value window of my Force Link persistent, I had the launching problem solved in less than 30 minutes.
Window Management:
Because the Calculator, Error Message and Help windows need to be accessible at most times, modal windows are rarely used in HA. However, if you allow the user to jump between open windows that modify the data base ( Preferences and the Check Register to name two ) something is going to be corrupted. As an example:
In the Preference window the user adds a new budget account, switches to the Check Register window, adds an entry into the data base using the new budget account, then switches back to the Preference window and selects Cancel.
Question, how do you handle the entry that now has an invalid budget account?
To solve this and other possible dilemmas, I created the window priority system. Basically this system assigns a low and high layering priority to each window created by HA. To make this work the Open window function must be handled by a universal method. The Windows menu ( and Window Bar ) directs Open Window commands to this method. This method takes the name ( or instance ) of the new window and determines it's highest priority. If the new window's highest priority is equal to or greater than the front window's lowest priority, then the new window is allowed to open, otherwise the request is ignored. As an example:
The Calculator window is given a high priority of 1 and a low priority of 10. The Preference window is given a high and low priority of 2. The Check Register window is given a high and low priority of 3. This allows the Calculator window to be in front of the Preference window or behind the Check Register window, but will prevent the Check Register window from being placed in front of the Preference window.
Modal windows ( About Home Accounting and Progress ) always have a high and low priority of 0.
Final Comments:
You don't need to be able to program in C, Pascal or assembly or even be able to read programs written in these languages to program the Mac with CPX, but it helps a lot in solving complex problems.
The functional demands placed on applications by users today requires a lot more knowledge than Prograph International can possibly supply with CPX. But their documentation still needs much more work in explaining how to use the supplied classes.
I apologize for the brevity of the article. The original article had three times more text and contained 42 graphics. There was just no way to make it fit into 9 pages.
Recommendations:
If your are serious about developing professional level applications on the Mac, you need to buy every Inside Macintosh book ( from Apple ) you can find ( you don't need specialty books like QuickTime ), old and new, as well as the Think Reference application. Plan on spending $300 to $400 minimum.
Get an AOL ( American On Line ) account. This is were most of the CPX support can be found.
Join a user group.
Get a Visual News subscription.
(And get yourself a VN sub--Ed)
Debugging your application is greatly simplified with the above resources.
This article appeared in the Visual News Issue #8 April 1994.
Last updated: Mar 4, 2011